


In recent years, the digital media landscape has buzzed with a term seemingly plucked from science fiction: deepfakes. We are well beyond the cartoon cut-out animations of JibJab ecards of 2004—the state of the art in audio and visual recreations of real people are so realistic that distinguishing fabricated content from genuine footage is increasingly difficult.
As with using any tool, intent matters. While deepfakes are frequently cited as a threat to government, business, and celebrities, swapping or changing faces in videos is not necessarily nefarious. Perhaps it's art. Perhaps it's fun.
It's not necessarily easy to do, either. Numerous tools exist, but most are either too complex or yield subpar results.
Enter FaceFusion. This tool offers seamless face swapping and restoration in videos, standing out due to its accessibility, speed, and ability to produce realistic deepfakes. Gone are the days when digital artists had to laboriously map, match, or train a face swapper for each video. FaceFusion's auto-detection feature instantly swaps faces, marrying user-friendliness with efficiency.
Skeptical? Here's a video we created in mere minutes and with just a few simple clicks:
As the line between reality and digital creations becomes increasingly blurred, tools like FaceFusion ultimately call for a paradigm shift in our perception of digital content. You can't always believe your own eyes. This article delves into FaceFusion, examining its features, installation process, and compatibility with both Windows and Mac platforms.
Background
One character inhabiting the visage of another has been a staple of storytelling for centuries. And the "deepfake" traces its origins back to early film and photography. Techniques to manipulate images and moving pictures have evolved along with technology, from the French film Eyes Without a Face in 1960 to Face/Off in 1997 to the Mission Impossible series.
This was typically a manual and labor-intensive process, and early deepfakes often suffered from misaligned features or glaring inconsistencies in lighting and texture. However, the introduction of neural networks and machine learning catapulted this practice into a new era.
The term "deepfake"—a fusion of "deep learning" and "fake"—encapsulates this technology's essence. Using deep learning algorithms, computers overlay images or videos onto existing source material.
As technology advanced, so too did the realism of deepfakes and the ease of creating them. New tools democratized the creation process, bringing the capability from Hollywood special effects shops to homes and offices.
Overview of FaceFusion
Designed specifically for video deepfakes, FaceFusion was created to empower everyday computer users to achieve results previously reserved for those with considerable computing power and expertise.
Key features of FaceFusion include:
- Integration with top face-enhancing algorithms.
- A frame enhancer that elevates the entire video's quality.
- Processing flexibility, with options for CPU or GPU usage.
- A user-friendly interface tailored for both beginners and experts.
Much of FaceFusion's accuracy is attributed to the "insightface" library, which automatically detects and replaces intricate facial features with precision, largely automating the process. (Those acquainted with deepfakes might recognize insightface as the technology behind Roop, a notable tool used for face-swapping in images, previously reviewed in depth by Decrypt.)
One initial limitation of the insightface model is its 128x128 default resolution, a limitation set by the developer for ethical reasons. Power users have circumvented this constraint, however, and further combined insightface with other face-enhancing algorithms like GFPGan, Gpen or Codeformer. The FaceFusion developer has also integrated the "opennsfw" library, which prevents the generation of explicit content.
Putting everything together, users can refine the output to produce sharp, clear faces. This method not only improves quality but also significantly reduces processing time.
Installation Guide
Hardware requirements:
At a minimum, a GPU with 4GB of vRAM is required. However, for optimal results in a reasonable timeframe, 8GB is recommended.
Step-by-step installation guide:
The most difficult part of using FaceFusion is installation, which requires the use of various terminal commands because there's currently no GUI to walk you through the process. This is a summary of the official guide.
Windows:
Before installing FaceFusion, install Python 3.10, Git, Microsoft Visual C++ 2015 Redistributable, and Microsoft Visual Studio 2022 build tools. To do so, follow these steps:
- Execute the following commands sequentially:
winget install -e --id Python.Python.3.10
python -m ensurepip
winget install -e --id Git.Git
winget install -e --id Gyan.FFmpeg
shutdown /r
winget install -e --id Microsoft.VCRedist.2015+.x64
winget install -e --id Microsoft.VisualStudio.2022.BuildTools --override "--wait --add Microsoft.VisualStudio.Workload.NativeDesktop --includeRecommended"
(For a more detailed guide, refer to the provided instructions.)
Users with Nvidia Cards should also install the latest version of the CUDA toolkit from this URL and the cuDNN libraries from this URL.
- To install FaceFusion, navigate to the FaceFusion installation folder and execute the following terminal command:
git clone https://github.com/facefusion/facefusion - Once you've installed the necessary components, establish a Python environment for FaceFusion's secure operation. Here's how:
- Create a folder where you wish to install FaceFusion.
- Open a terminal at that location.
- Execute these commands sequentially:
python -m venv venv venv\Scripts\activate - Next, install the Python libraries required for FaceFusion:
python install.py - You're now set up! To launch FaceFusion, open a terminal in the installation directory and run:
python run.py - Upon completion, the terminal will provide a local URL, like http://127.0.0.1:7860/. Copy and open this in your browser to begin crafting your deepfakes!
MacOS:
Macs come in two varieties: older Intel processor models and newer Apple silicon M1 variants. Installation is similar for both, and the provided script will guide you through the process.
Similar to Windows, Mac users must install several components before utilizing FaceFusion:
- Install Homebrew:
/bin/bash -c "$(curl -fsSL https://raw.githubusercontent.com/Homebrew/install/HEAD/install.sh)" - Execute these commands sequentially:
brew install python@3.10 python -m ensurepip brew install git brew install ffmpeg - Navigate to your desired FaceFusion installation directory and clone the FaceFusion repository by executing this command:
git clone https://github.com/facefusion/facefusion - In the terminal, navigate to the FaceFusion folder and execute:
python -m venv venv source venv/bin/activate - With that, you're ready to go! From the FaceFusion directory, run the command below and select your Mac's configurations (Intel, M1, etc):
python install.py - When prompted, select your Mac type to install dependencies. Then, run:
pip install -r requirements.txt - To launch FaceFusion, ensure your terminal is in the FaceFusion directory and execute:
python run.py - You'll receive a URL, like http://127.0.0.1:7860/. Copy and paste this into your browser to start generating deepfakes.
Note: If commands prefixed with python or pip fail, try using python3 or pip3 instead.
User Guide
In contrast to its command-line based installation, FaceFusion's visual user interface is refreshingly intuitive:
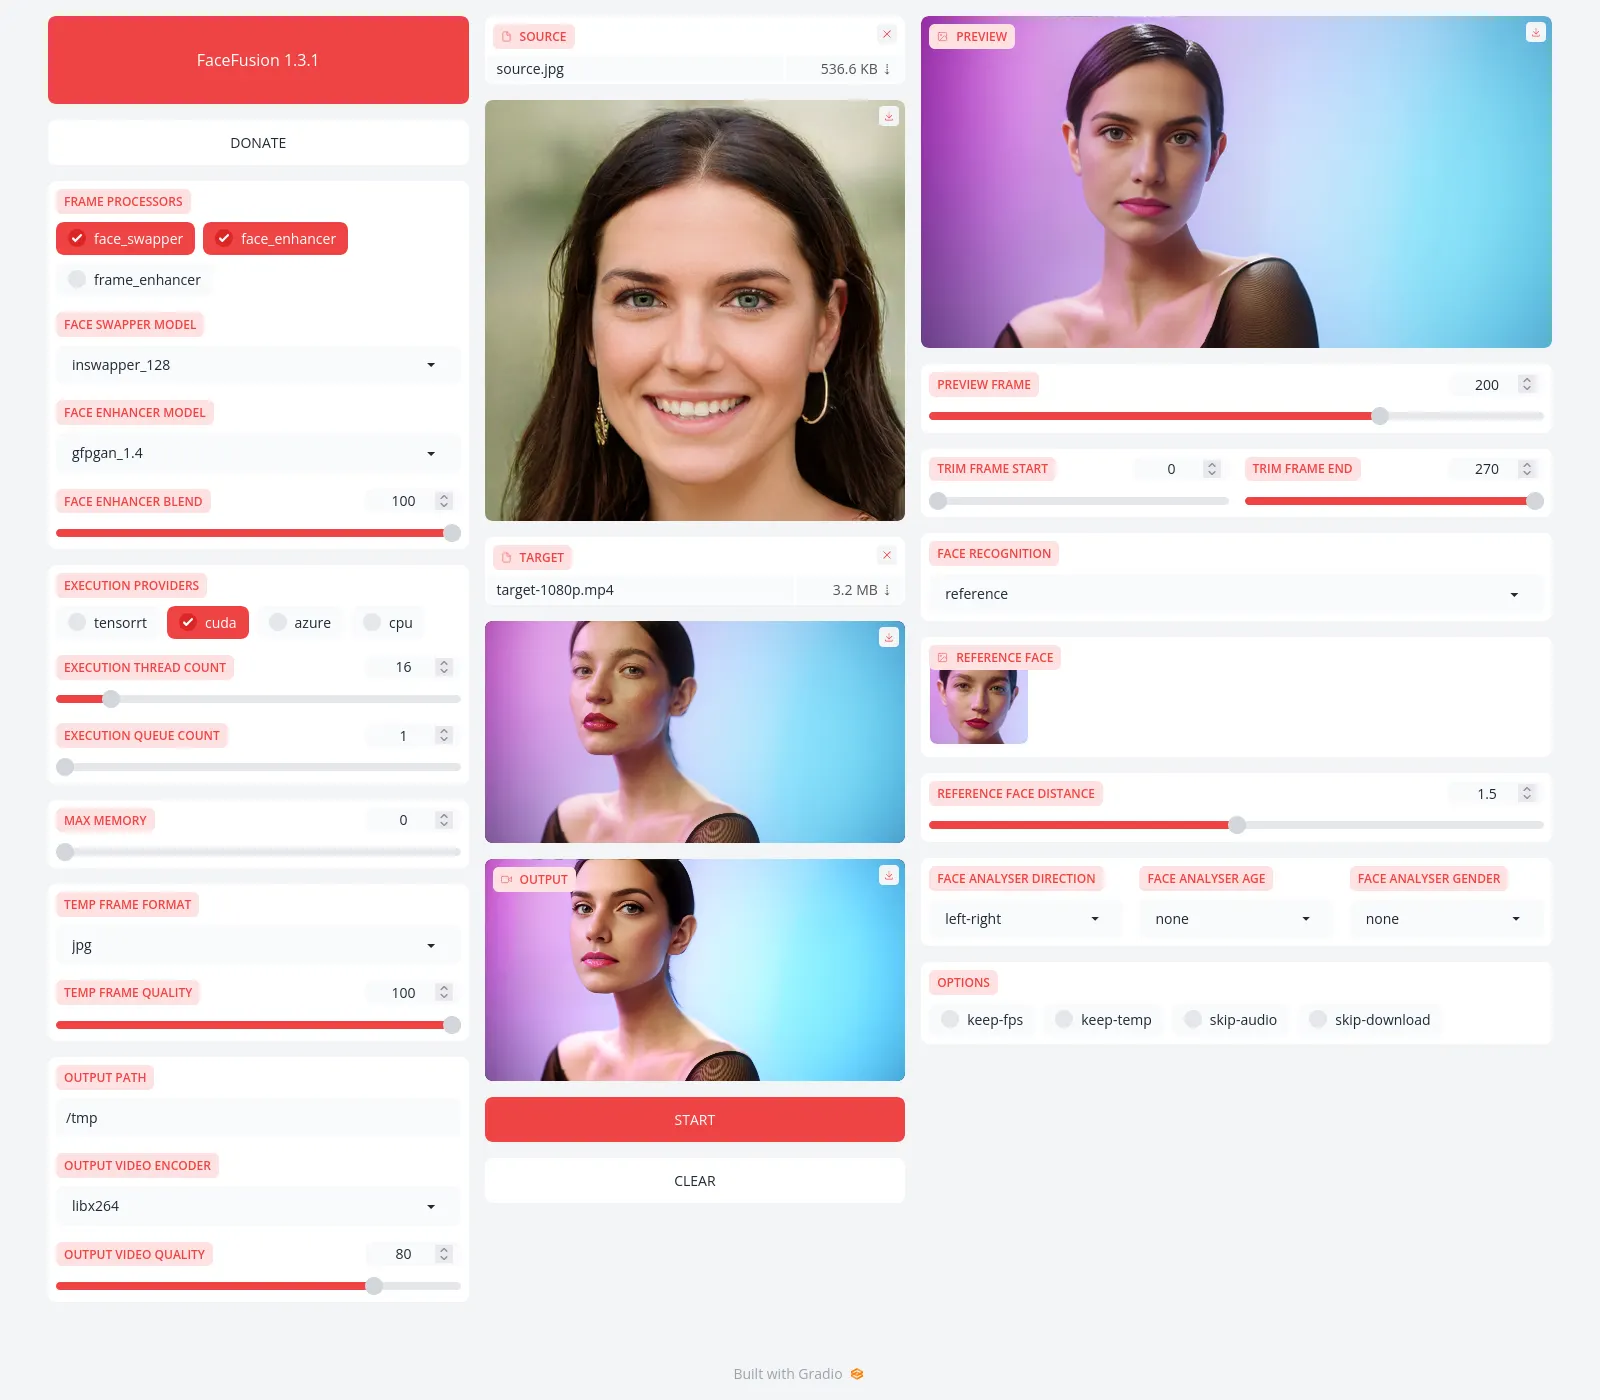
How to use FaceFusion:
- Import your desired video: Drag and drop it into the "TARGET" field or click on "TARGET" and select it from the popup.
- Choose the face to swap: Similarly, drag and drop or use the "SOURCE" box.
- The model's parameters are preset for the best average results. Click "Start" and watch the transformation.
- The newly generated video will display below "TARGET," labeled "OUTPUT." Save it using the arrow in the preview's top right corner.
For those wanting to adjust parameters, here are some key definitions:
- Face Distance: A measure of face similarity. A low value may prevent swaps, while too high a value can produce artifacts. Values between 2 and 2.5 often yield good results.
- Face Analyzer Detection: Determines how the model scans for faces. Default is left-right, but up-down sometimes offers better results.
- Execution Providers: For powerful computers, enable GPU acceleration with CoreML (M series Macs) or CUDA and Tensorrt (Windows). Selecting only CPU will be considerably slower.
- Face Enhancer Model: Different models yield varied results based on reference faces. GFPGan 1.4 is often superior, but experimentation can be beneficial. It's essential to select one—otherwise, faces might appear blurry or unrealistic.
- Frame Enhancer Model: Enhances each frame's quality. Great for detailed projects, but can be very time-consuming. For example, a video with frame and face enhancer activated can sometimes take hours versus a couple of minutes if the frame enhancer is not activated.
- Face Recognition: "Reference" swaps the previewed face with the "SOURCE" face. "Many" detects all video faces and replaces them with the source face, addressing instances where the model might misidentify faces across frames.
Tips for Optimal Results:
- Use a centered, high-quality image.
- Avoid photos with glasses, hats, or other obstructions.
- Avoid photos with exaggerated expressions.
- Refrain from deepfaking videos where subjects scream, open their mouths wide, or block their faces (touching their face, putting on glasses, drinking something, etc)
- Remember, this tool takes time to work on each frame of a video. Consider that videos have from 24 to 60 and even more frames per second, you will need to experiment with short videos before moving on to longer ones. TikTok videos are a good place to start.
FaceFusion Review
In the world of deepfakes, FaceFusion genuinely eclipses many of its peers. After extensive testing, it's clear that FaceFusion delivers. Its use of the insightface library streamlines face-swapping, optimizing efficiency and user experience. Its ethical commitment to preventing NSFW content generation is also laudable.
From a user standpoint, the ability to operate locally is invaluable. In an age of heightened data privacy concerns, the independence from cloud-based resources is a welcome feature. However, future versions need to offer a more user-friendly GUI, especially for initial installation.
FaceFusion has raised overall expectations of deepfake technology, democratizing the creation process with ethical safeguards.
Strengths:
- Advanced Capabilities: FaceFusion is arguably the market's top tool for home-made deepfakes, surpassing many counterparts with its innovative algorithms and features.
- Local Operation: In our cloud-centric age, FaceFusion's ability to function offline respects user privacy and underscores its efficiency.
- Reduced Training Time: Unlike many tools that demand lengthy training periods, FaceFusion significantly reduces time requirements.
- Safety Measures: Integrating opennsfw to detect and prevent NSFW image generation ensures responsible tool usage and safeguards against potential misuse.
Weaknesses:
- User Intuitiveness: Despite its advanced features, FaceFusion might intimidate first-time users. The Github repository even warns users by saying, "the installation needs technical skills and is not for beginners."
- Developer Communication: Redirecting users from platforms like GitHub to Discord may not be everyone's communication preference.
- Lack of GUI: A graphical user interface for installation could make the process more inviting to beginners or those less familiar with the command line.
Now, why not transform yourself into a superhero or superstar? You might not be a CGI artist, but with FaceFusion, you're very nearly one.
Edited by Ryan Ozawa.