
Whether you're a digital artist seeking fresh inspiration or just a regular Joe with an insatiable hunger for visuals, Stable Diffusion is set to become your new go-to tool. The best part? It's open-source and completely free, inviting everyone to don their creative hats. But be warned: like any skilled artist, it has the potential to produce NSFW content if that's what your 'recipe' requires.
Stable Diffusion is a Text-to-Image Generative AI tool, which means it translates words into images. The process is akin to mailing a detailed brief to a master painter and awaiting the return of a meticulously created artwork.
Consider Stable Diffusion your personal AI-based creative ally. Primarily engineered for generating images from text prompts, this deep learning model extends beyond a single function. It can also be utilized for inpainting (altering sections of an image), outpainting (expanding an image beyond its existing borders), and translating images based on text prompts. This versatility equates to having a multi-talented artist at your disposal.
The Mechanics of Stable Diffusion
Stable Diffusion operates on the basis of a deep learning model that crafts images from text descriptions. Its mainstay is a diffusion process, where an image is morphed from random noise into a coherent image via a series of steps. The model is trained to steer each phase, hence guiding the entire process from inception to completion, as per the provided text prompt.
The central idea behind Stable Diffusion is the conversion of noise (randomness) into an image. The model kickstarts the process with a heap of random noise (think of a colorized version of the white noise from an out-of-signal TV) which is then gradually refined, influenced by the text prompt, into a discernible image. This refinement proceeds systematically, steadily decreasing the noise and intensifying the detail until a high-quality image emerges.

As the diffusion process kicks off, the preliminary stages largely dictate the overall composition of the image, with subsequent keyword alterations affecting only minor portions. This emphasizes the need for careful attention to your keyword weighting and scheduling to realize your desired outcome.
Pros and Cons of Stable Diffusion
Among its strengths, Stable Diffusion excels at creating detailed, high-quality images, custom-designed to specific prompts. It easily navigates across various art styles, seamlessly blends techniques of different artists, and smoothly transitions between varying keywords.
Unlike its counterparts such as MidJourney, Stable Diffusion comes free of charge, a boon for your budget. It is also open source, which means you can modify it as you want. Whether you aspire to create futuristic landscapes or anime-inspired images, Stable Diffusion has a model for that. We will later delve into how to download and tailor these models to your preference.
You can run it offline, eliminating the need for constant internet connection or server access, making it a valuable tool for privacy-conscious users.
However, there are some drawbacks
Unlike MidJourney, Stable Diffusion has a steep learning curve. To generate truly remarkable images, you must engage with custom models, plugins, and a sprinkle of prompt engineering. It is a little bit of a Windows vs Linux situation.
Also, the model can occasionally exhibit unforeseen associations, leading to unexpected results. A slight miss in the prompt can lead to significant deviations in the output. For example, specifying eye color in a prompt might unintentionally influence the ethnicity of the generated characters (for example, blue eyes are usually associated to caucasians). Therefore, a deep understanding of its workings is necessary for optimal results.
Additionally, it necessitates an extensive amount of detail in the prompt to deliver impressive results. Unlike MidJourney, which performs well with prompts like "a beautiful woman walking in the park", Stable Diffusion requires a comprehensive description of everything you wish to (or not to) see in your image. Be prepared for long, detailed prompts.
Operating Stable Diffusion
There are multiple ways to run Stable Diffusion, either via cloud-based platforms or directly on your local machine.
These are some of the online platforms that let you test it in the cloud:
- Leonardo AI: Allows you to experiment with different models, some of which emulate the aesthetics of MidJourney.
- Sea Art: A nice place to test a lot of Stable Diffusion models with plugins are other advanced tools.
- Mage Space: Offers Stable Diffusion versions v1.5 and 2.1. Although it has a broad gallery of other models, it requires membership.
- Lexica: A user-friendly platform that guides you to discover optimal prompts for your images.
- Google Colabs: Another accessible option.
However, if you opt for a local installation, ensure your computer has the necessary capabilities.
System Requirements
To run Stable Diffusion locally, your PC should run on Windows 10 or higher, and at least sport a discrete Nvidia video card (GPU) with at least 4 GB VRAM, have 16GB of RAM, and at least 10GB of free space.
For an optimal experience, an RTX GPU with 12GB of vRAM, 32 GB of RAM, and a high-speed SSD are recommended. Disk space will depend on your specific needs: the more models and add-ons you plan to use, the more space you'll require. Generally, models need between 2GB and 5 GB of space.
Navigating Stable Diffusion with Automatic 1111
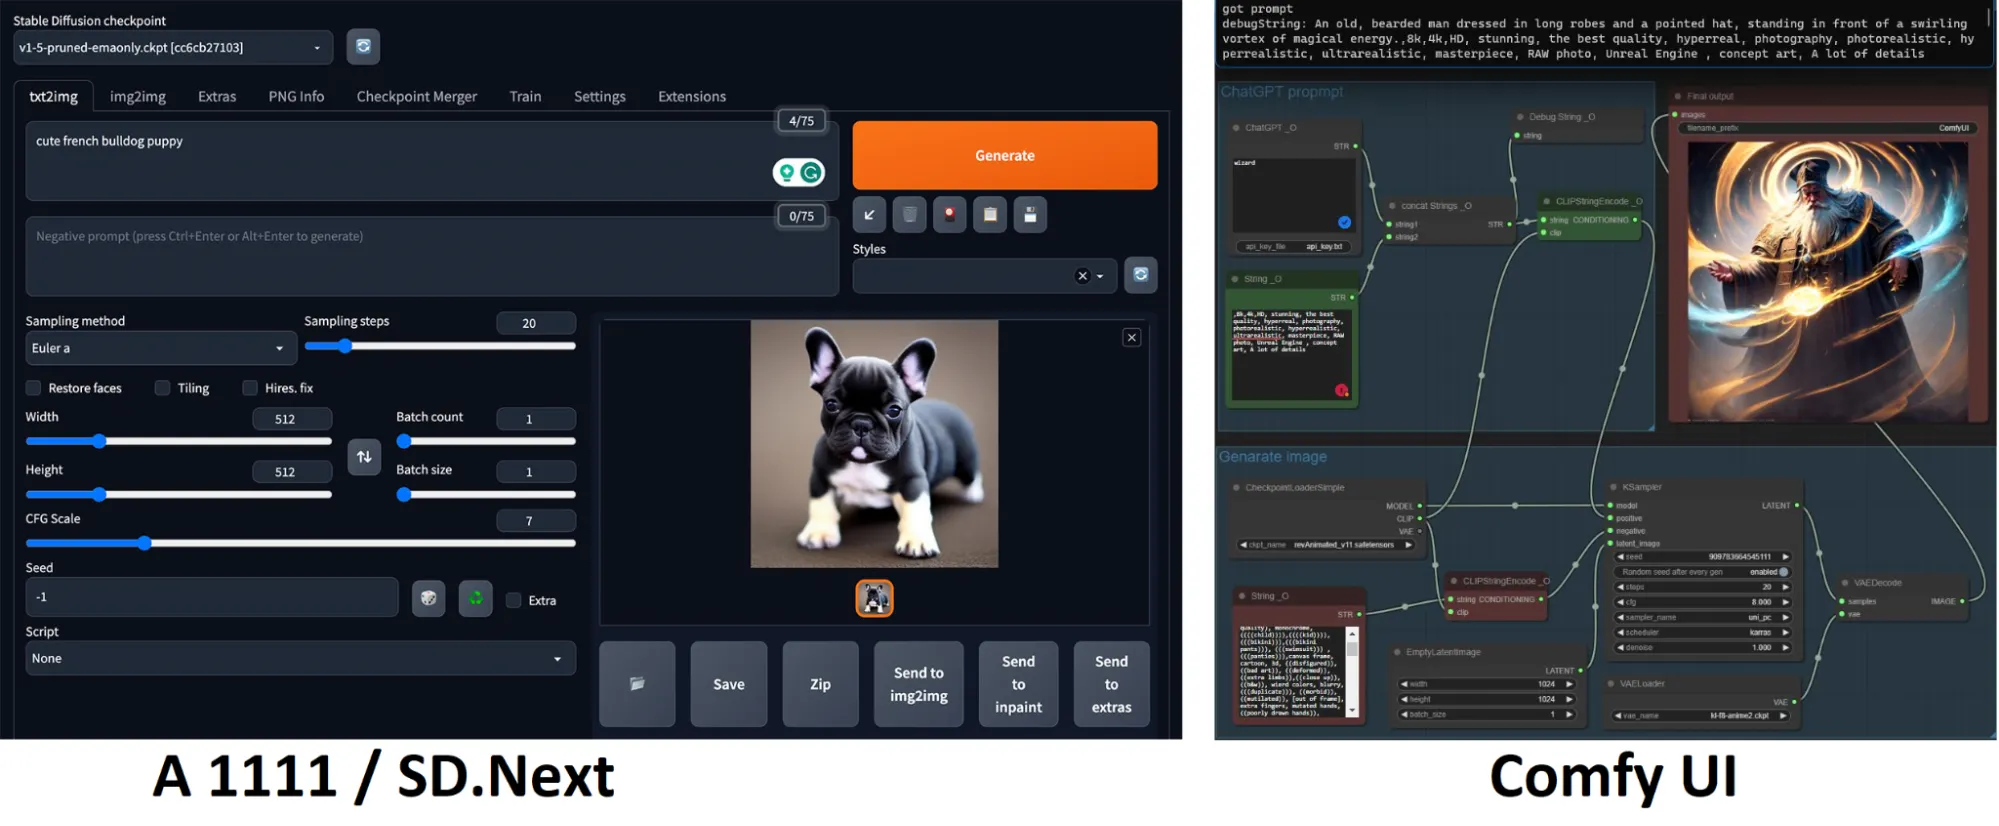
As you set out on your journey with Stable Diffusion, choosing the right Graphical User Interface (GUI) becomes crucial. For outpainting, Invoke AI leads the pack, while SD.Next champions efficiency. ComfyUI is a node-based super lightweight option that has been gaining a lot of steam lately because of its compatibility with the new SDXL. However, Automatic 1111, with its popularity and user-friendliness, stands as the most preferred. Let's delve into how you can get started with Automatic 1111.
Setting Up Automatic 1111
The installation process of Automatic 1111 is uncomplicated, thanks to the one-click installer available on this repository. Proceed to the “assets” section of the Github page, download the .exe file, and run it. It may take a moment, so hang in there—remember, patience is key.
Upon successful installation, an 'A1111 WebUI' shortcut will materialize within a newly opened folder. Consider pinning it to your taskbar or creating a desktop shortcut for easier access. Clicking this shortcut will launch Stable Diffusion, ready for your creative commands.
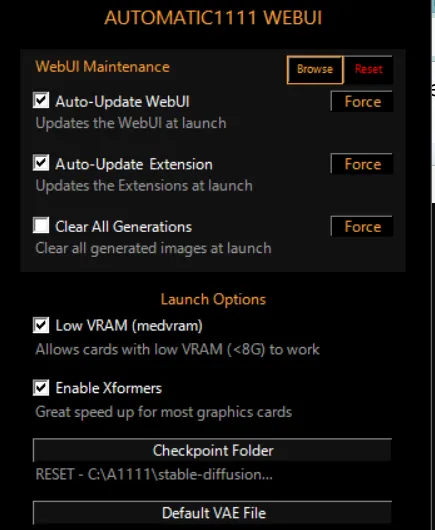
It would be a good idea to tick the boxes for: Auto-Update WebUI (keep the program up to date), Auto Update Extensions (keep the plugins and third party tools updated), and, if your Pc is not that powerful, the Low VRam (medvram) and the option to enable Xformers should also be activated.
Understanding the User Interface
Once you have Stable Diffusion with A1111 installed, this is what you will see when you open it
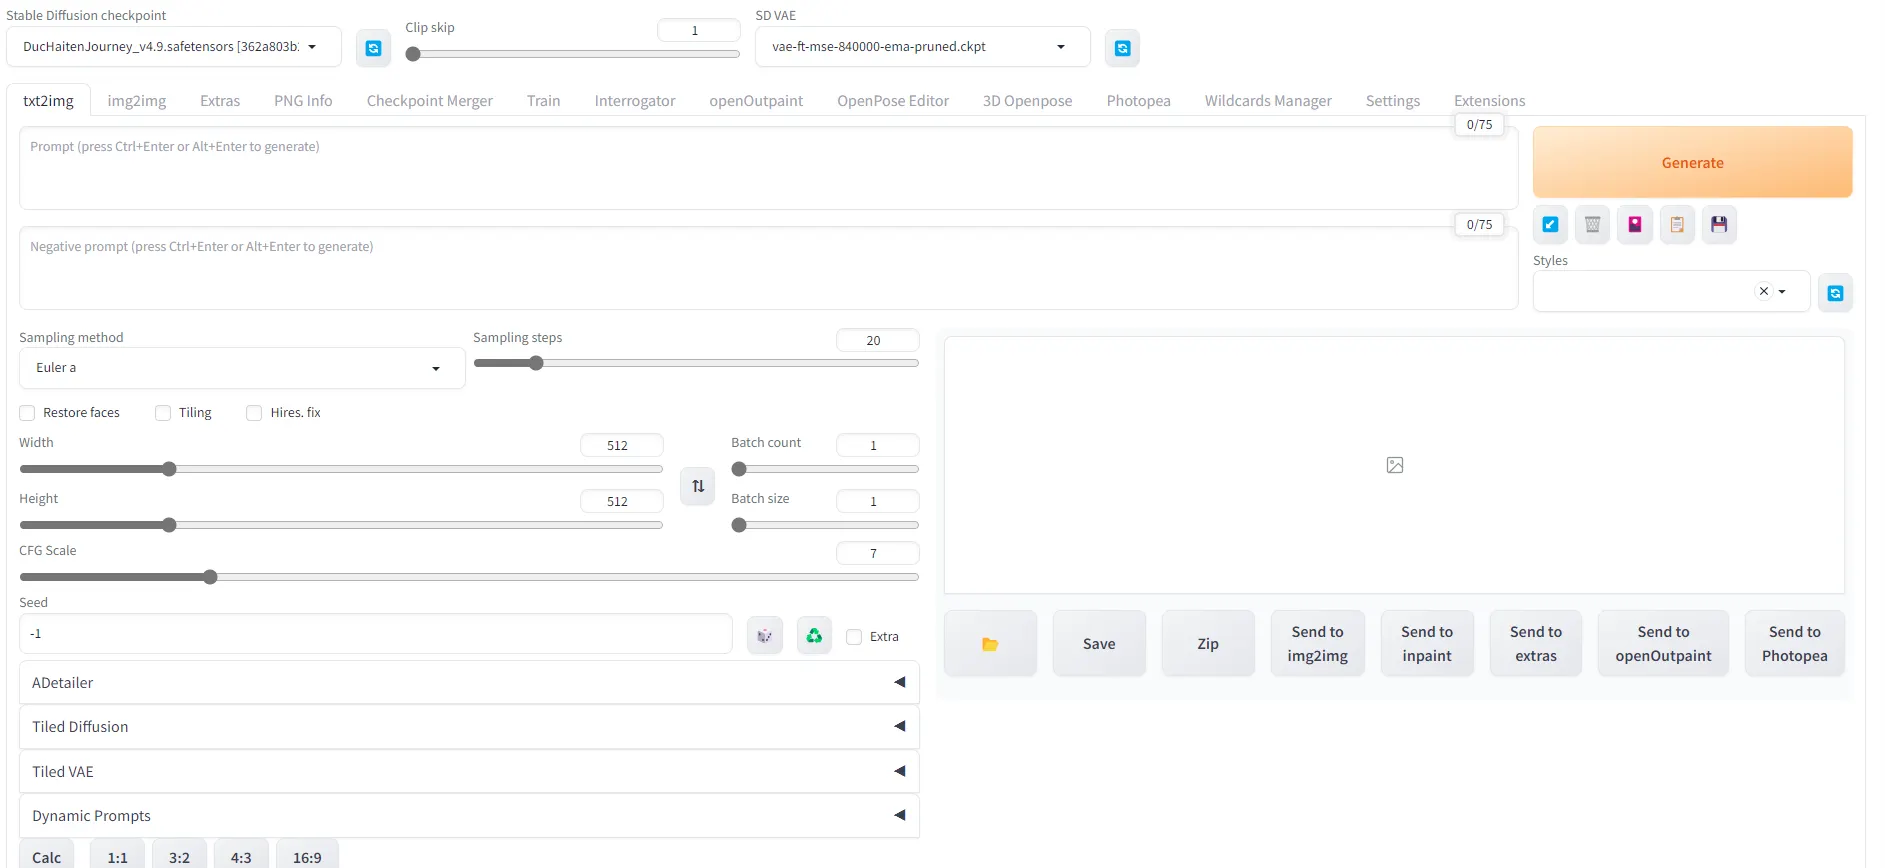
But don’t be intimidated. Here's your brief tour of the interface when running Stable Diffusion:
- Checkpoint or Model: Essentially the heart behind your AI image operation, these pre-trained Stable Diffusion weights can be compared to having diverse artists trained in varied genres. One could be adept at anime, while another excels in realism. Your choice here sets the artistic style of your image.
- Positive Prompt: This is where you articulate what you desire in your image.
- Negative Prompt: Specify what you don’t want to see in your artwork here.
- Create Style: If you wish to save a particular combination of positive and negative prompts as a 'style' for future use, do so by clicking here.
- Apply Style: Implement a previously saved style to your current prompt.
- Generate: Once you've set all parameters, click here to bring your image to life.
- Sampling Steps: This parameter defines the steps taken to morph random noise into your final image. A range between 20 and 75 usually yields good results, with 25-50 being a practical middle ground.
- Sampling Method: If the Models represent the heart of this program, a sampler is the brain behind everything. This is the technique used to take your prompts, your encoders, and every parameter and convert the noise into a coherent image according to your orders. There are many samplers, but we recommend “DDIM” for fast renders with few steps, “Euler a” for drawings or photos of people with smooth skin, and “DPM “for detailed images (DPM++ 2M Karras is probably a good safe bet).
Here is a compilation of the results obtained with the different sampling methods for Stable Diffusion. - Batch Count: Batch count will run multiple batches of generations, one after the other. This will let you create different images with the same prompt. This takes longer times, but uses less vRAM because each image is generated after a previous one is done
- Batch Size: This is how many parallel images in each batch. This will give you more images, more quickly —but it will also take more vRAM to process because it generates any images in the same generation.
- CFG Scale: It determines the model's creative freedom, striking a balance between adhering to your prompt and its own imagination. A low CFG will make the model ignore your prompt and be more creative, a high CFG will make it stick to it with no freedom at all. A value between 5 and 12 is typically safe, with 7.5 providing a reliable middle ground.
- Width and Height: Specify your image size here. Starting resolutions could be 512X512, 512X768, 768x512, or 768x768. For SDXL (Stability AI’s latest model) the base resolution is 1024x1024
- Seed: Think of this as the unique ID of an image, setting a reference for the initial random noise. It’s crucial if you intend to replicate a particular result. Also, each image has a unique seed, which is why it is impossible to truly replicate 100% a specific real life image —because they don’t have a seed.
- The Dice Icon: Sets the seed to -1, randomizing it. This guarantees uniqueness for each image generation.
- The Recycle Icon: Retains the seed from the last image generation.
- Script: It's the platform for executing advanced instructions that impact your workflow. As a beginner, you might want to leave this untouched for now.
- Save: Save your generated image in a folder of your choice. Note that Stable Diffusion also auto-saves your images in its dedicated 'output' folder.
- Send to img2img: Sends your output to the img2img tab, allowing it to be the reference for new generations that will resemble it.
- Send to inpaint: Directs your image to the inpaint tab, enabling you to modify specific image areas, like eyes, hands, or artifacts.
- Send to extras: This action relocates your image to the 'extras' tab, where you can resize your image without significant detail loss.
That's it—you are all set! Now, let your creativity flow, and see the magic of Stable Diffusion unfold.
Prompt Engineering 101: How to craft good prompts for SD v1.5
A successful venture with Stable Diffusion is largely dependent on your prompt – think of it as a compass steering the AI. The richer the details, the more accurate your image generation will be.
Prompt crafting may sometimes seem daunting, as Stable Diffusion doesn't follow a linear pattern. It's a process steeped in trial and error. Start with a prompt, generate images, select your preferred output, modify elements you cherish or wish to eliminate, and then begin afresh. Rinse and repeat this process until your masterpiece emerges from inpainting tweaks and relentless improvements.
Positive Prompts, Negative Prompts, and Fine-Tuning Keyword Weight
Stable Diffusion's design enables keyword weight adjustment with the syntax (keyword: factor). A factor below 1 downplays its importance, while values above 1 amplify it. To manipulate the weight, select the specific keyword and hit Ctrl+Up for an increase or Ctrl+Down for a decrease. Additionally, you can utilize parentheses – the more you employ, the heavier the keyword weight.
Modifiers add that final flourish to your image, specifying elements like mood, style, or details like "dark, intricate, highly detailed, sharp focus."
Positive prompts outline your desired elements. A reliable strategy for prompt construction is specifying the type of image, subject, medium, style, setting or scenery, artist, tools used, and resolution, in that order. A demonstration from civitai.com could be “photorealistic render, (digital painting),(best quality), serene Japanese garden, cherry blossoms in full bloom, (((koi pond))), footbridge, pagoda, Ukiyo-e art style, Hokusai inspiration, Deviant Art popular, 8k ultra-realistic, pastel color scheme, soft lighting, golden hour, tranquil atmosphere, landscape orientation”
Conversely, negative prompts detail everything you wish to exclude from the image. Examples include: dull colors, ugly, bad hands, too many fingers, NSFW, fused limbs, worst quality, low quality, blurry, watermark, text, low resolution, long neck, out of frame, extra fingers, mutated hands, monochrome, ugly, duplicate, morbid, bad anatomy, bad proportions, disfigured, low resolution, deformed hands, deformed feet, deformed face, deformed body parts, ((same haircut)), etc. Don’t be afraid of describing the same thing with different words.
A good way to think about a prompt is The “What+SVCM (Subject, Verb, Context, Modifier)” structure:
- What: Identify what you want: Portrait, Photo, Illustration, Drawing, etc.
- Subject: Describe the subject you are thinking about: a beautiful woman, a superhero, an old asian person, a black soldier, little kids, a beautiful landscape.
- Verb: Describe what the subject is doing: Is the woman posing for the camera? Is the superhero flying or running? Is the asian person smiling or jumping?.
- Context: Describe the scenery of your idea: Where is the scene happening? In a park, in a classroom, in a crowded city? be as descriptive as you possibly can
- Modifiers: add additional information about your image: If it’s a picture, which lens was used. If it’s a painting, which artist painted it? Which type of lighting was used, which site would feature it? Which clothing or fashion style are you thinking about, is the image scary? These concepts are separated by commas. But remember, the closer to the beginning, the more prominent they will be on the final composition. If you don’t know where to start, this site, and this this Github repository have a lot of good ideas for you to experiment if you don’t want to just copy/paste other people’s prompts
So, an example of a positive prompt could be: Portrait of a cute poodle dog posing for the camera in an expensive hotel, (((black tail))), fall, bokeh, Masterpiece, hard light, film grain, Canon 5d mark 4, F/1.8, Agfacolor, unreal engine.
Negative prompts don’t need a proper structure, just add everything you don’t like, as if they were modifiers. If you generate a picture and see something you don’t like, just add it to your negative prompt, rerun the generation and evaluate the results. That’s how AI image generation works, it’s not a miracle.An example of a negative prompt could be: blurry, poorly drawn, cat, humans, person, sketch, horror, ugly, morbid, deformed, logo, text, bad anatomy, bad proportions
Keyword Integration and Prompt Scheduling
Keyword blending or prompt scheduling employs the syntax [keyword1: keyword2: factor]. The factor, a number between 0 and 1, determines at which step keyword1 switches to keyword2.
The Lazy Way Out: Copying Prompts
If you're unsure where to start, consider leveraging ideas from various websites and adapt them to suit your needs. Excellent sources for prompts include:
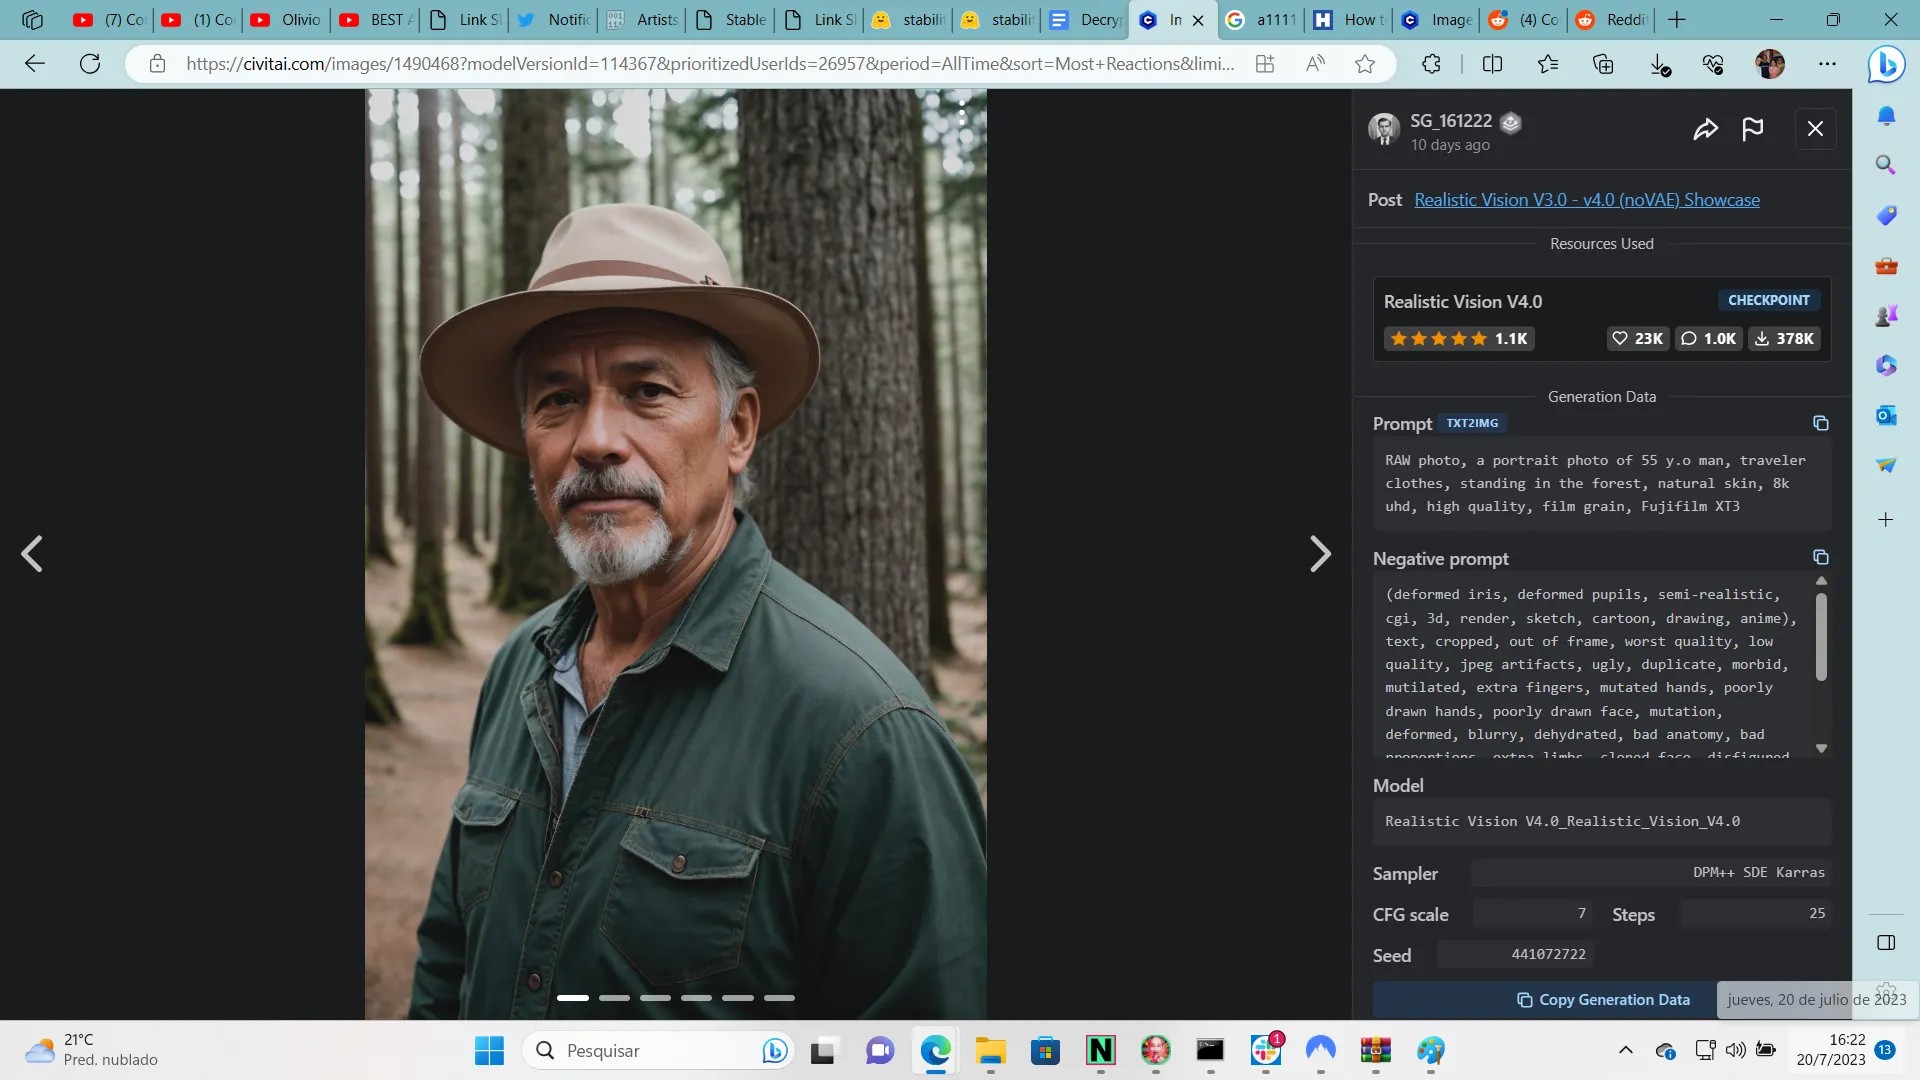
Alternatively, save an AI-generated image you admire, drag and drop it onto the “PNG Info” tab, and Stable Diffusion provides the prompt and relevant information to recreate it. If the image isn't AI-generated, consider using the CLIP Interrogator add-on to gain a better understanding of its description. Further details on this add-on are provided later in the guide.
Avoiding Pitfalls
Stable Diffusion is only as good as the prompts it's given. Thriving on detail and accuracy, it's essential to provide clear and specific prompts and favor concepts over explanations. Instead of crafting an elaborate sentence to describe a spacious, naturally lit scene, simply say "spacious, natural light."
Be mindful of unintended associations that certain attributes might bring, such as specific ethnicities when specifying eye color. Staying alert to these potential pitfalls can help you craft more effective prompts.
Remember, the more specific your instructions, the more controlled your outcome. However, be careful if you pretend to create long prompts, because using contradictory keywords (for example long hair, and then sort hair, or blurry in the negative prompt and blur on the positive prompt) might lead to unexpected results:
Installing New Models
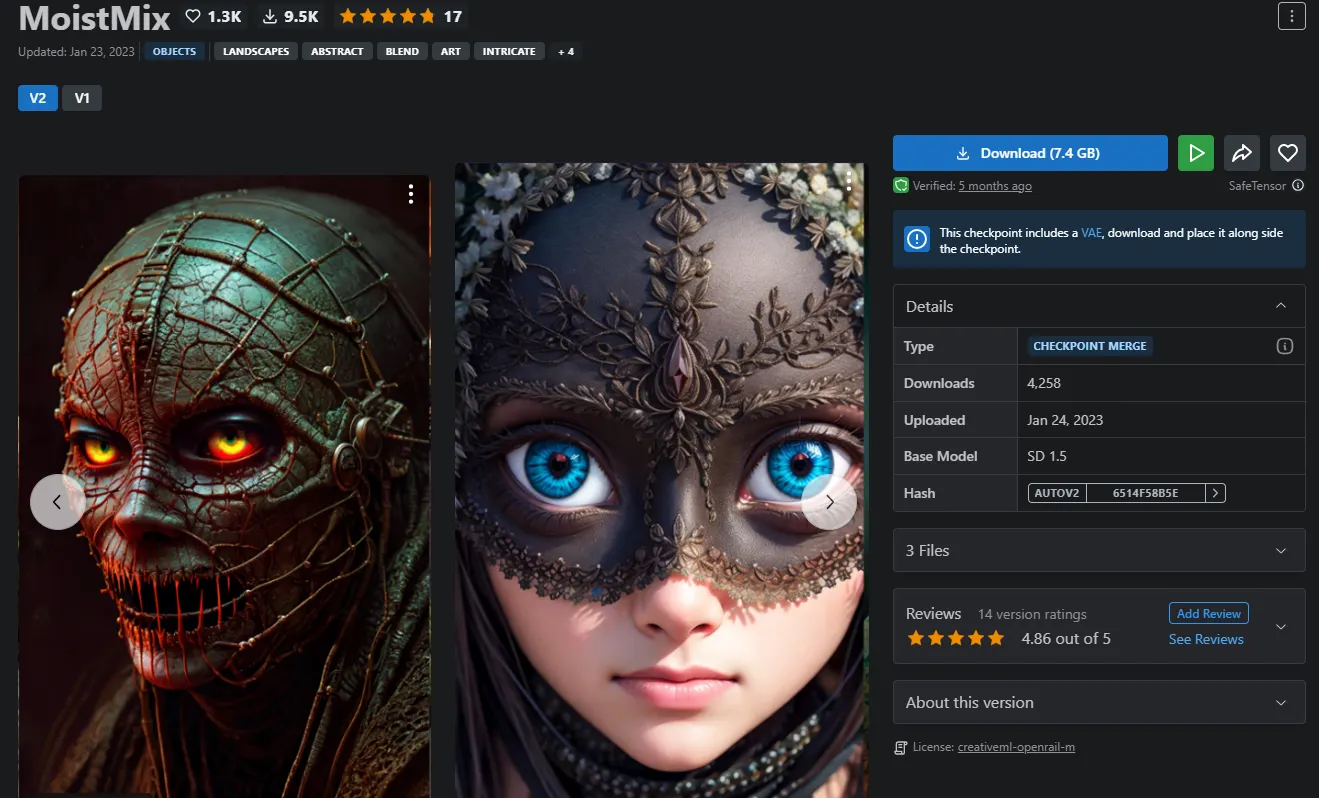
Installing models is a straightforward process. Begin by identifying a model suited to your needs. A great starting point is Civitai, renowned for being the largest repository of Stable Diffusion tools. Unlike other alternatives, Civitai encourages the community to share their experiences, providing visual references to a model’s capabilities.
Visit Civitai, click on the filter icon, and select “Checkpoints” in the “model types” section.

Then, browse through all the models available on the site. Keep in mind that Stable Diffusion is uncensored, and you may encounter NSFW content. Select your preferred model and click on download. Ensure the model has a .safetensor extension for safety (older models used a .ckpt extension which is not as safe).
Once downloaded, place it in your local Automatic 1111's models folder. To do this, navigate to the folder where you installed your Stable Diffusion with A111 and follow this route: “stable-diffusion-webui\models\Stable-diffusion”
There are hundreds of models to choose, but for reference, some of our top picks are:
- Juggernaut, Photon, Realistic Vision and aZovya Photoreal if you want to play with photorealistic images.
- Dreamshaper, RevAnimated, and all the models by DucHaiten if you enjoy 3d Art.
- DuelComicMix, DucHaitenAnime, iCoMix, DucHaitenAnime if you like 2d art like mangas and comics.
Editing your image: Image-to-Image and Inpainting (TO DO)
Stable Diffusion also allows you to use AI to edit images you don't like. You may want to change the artistic style of your composition, add birds to the sky, remove artifacts, or modify a hand with too many fingers. For this, there are two techniques: Image to Image and Inpainting.
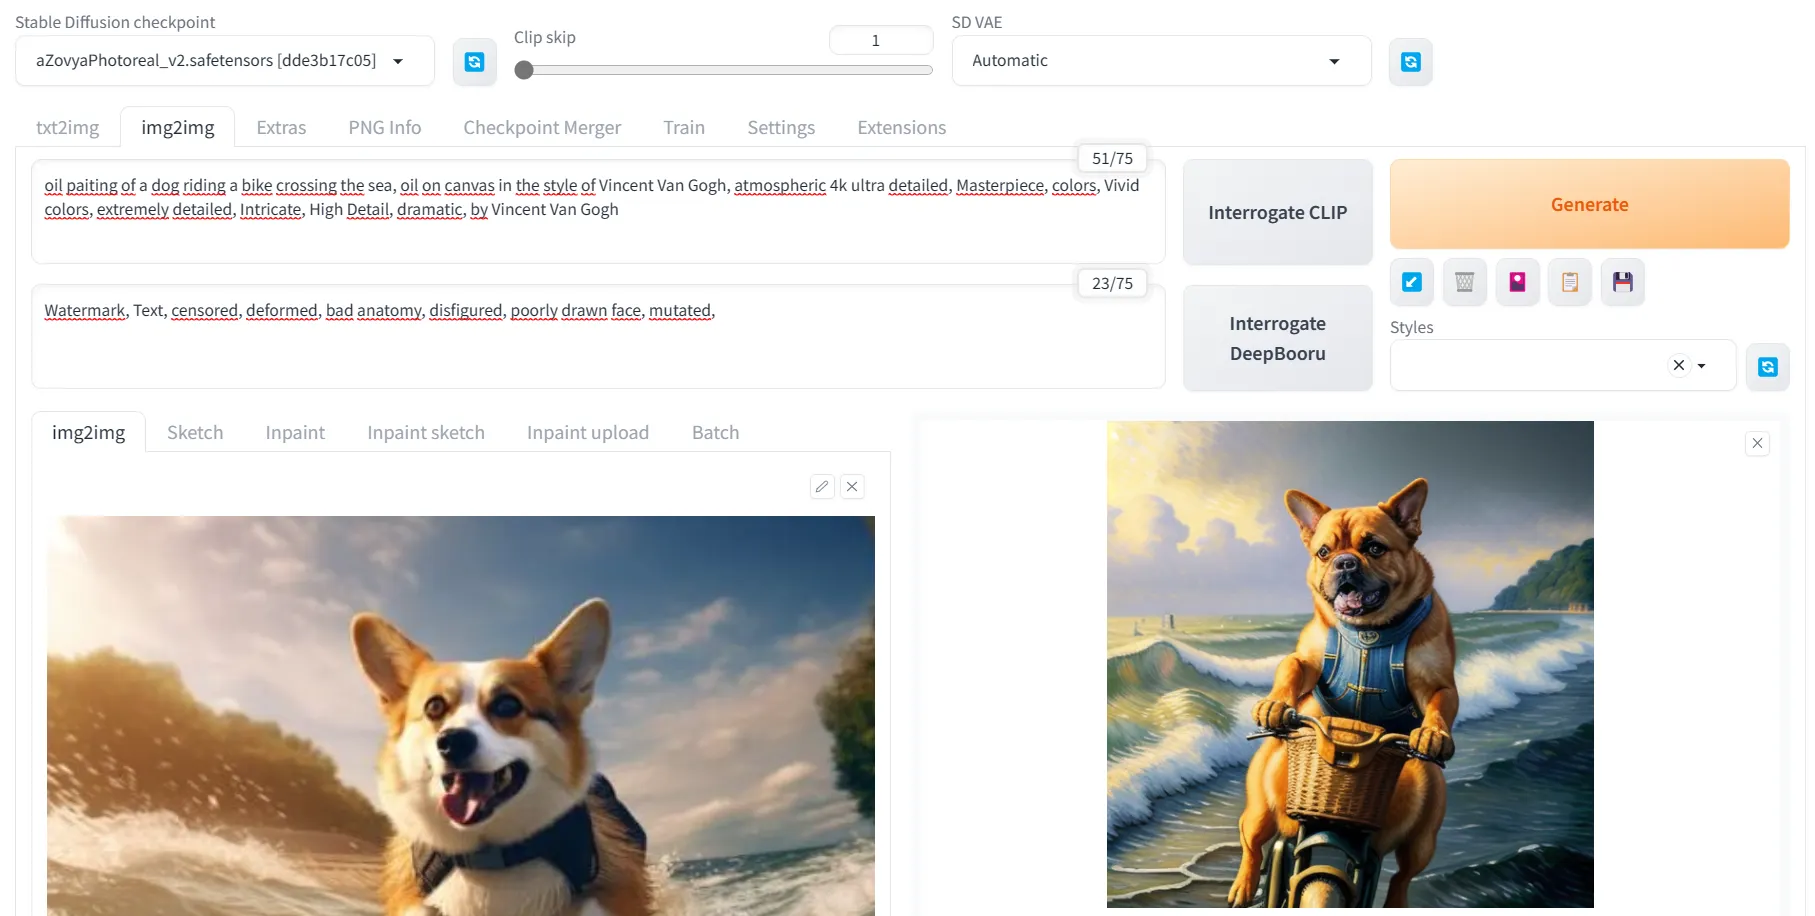
Image to Image essentially lets Stable Diffusion create a new image using another picture as reference, doesn’t matter whether it's a real image or one you've created. To do this, just click on the Image to Image (Img2Img) tab, place the reference image in the appropriate box, create the prompt you want the machine to follow, and click generate. It's important to note that the more denoising strength you apply, the less the new image will resemble the original because Stable Diffusion will have more creative freedom.
Knowing this, you can do some cool tricks, like scanning those old photos of your grandparents as a reference, running them through Stable Diffusion with low denoising strength and a very general prompt like “RAW, 4k image, highly detailed”, and see how the AI reconstructs your photo.
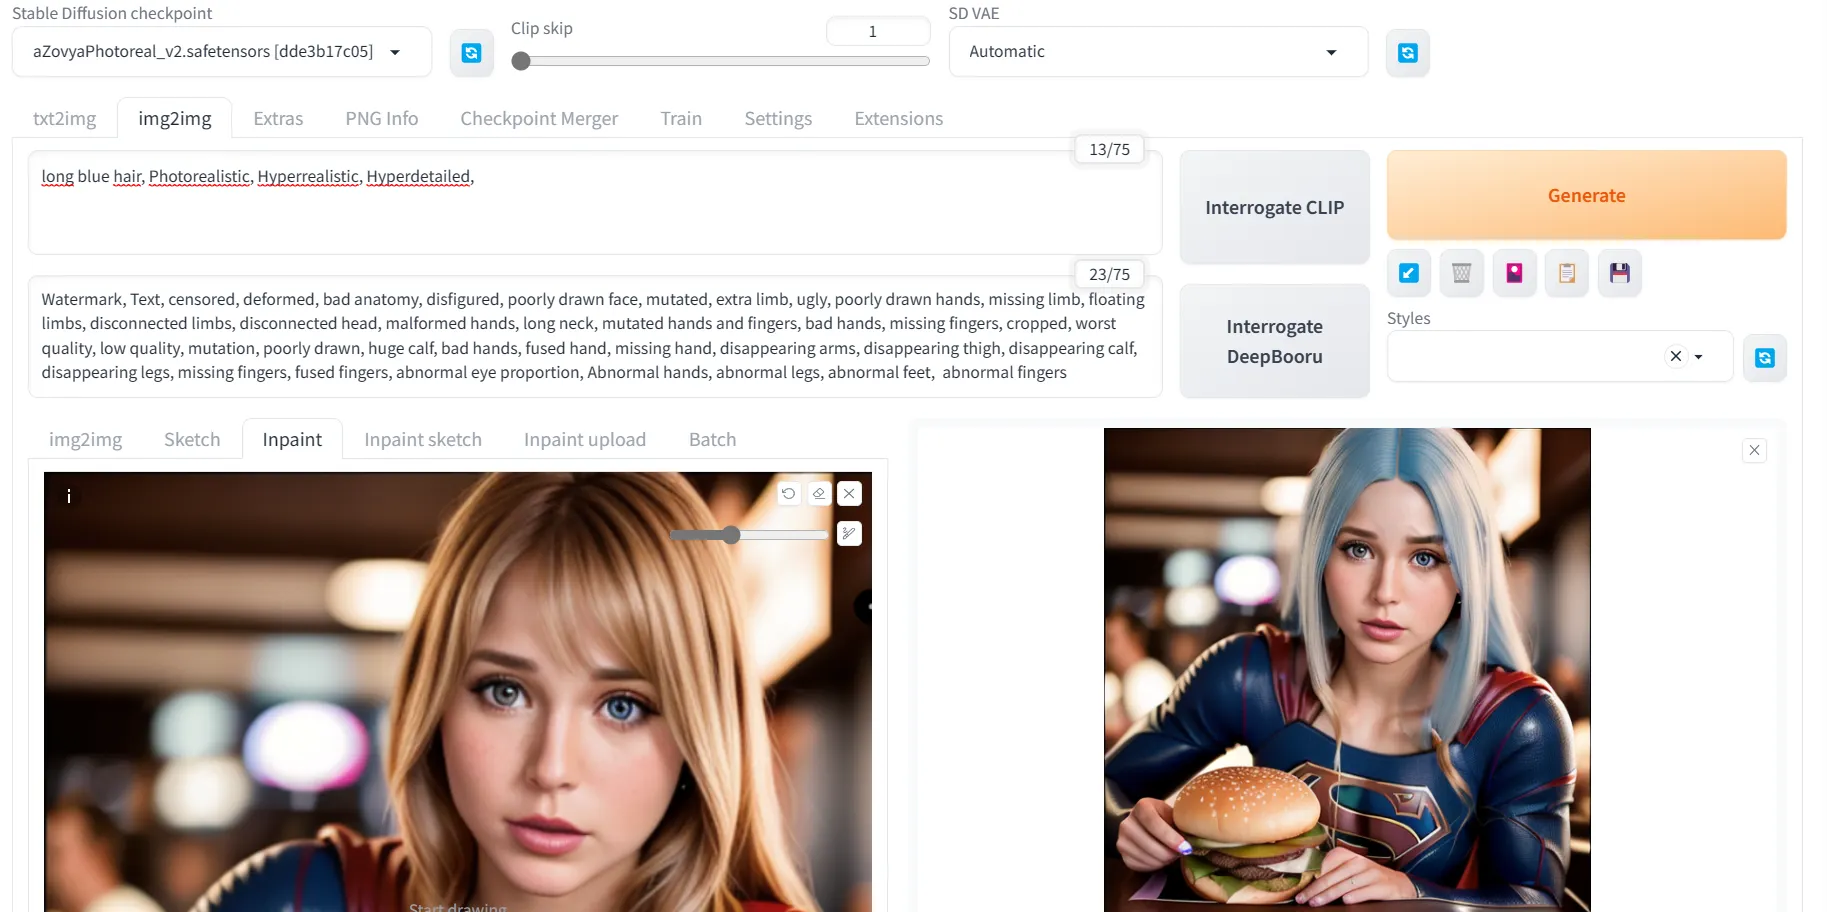
Inpainting allows you to paint or edit things within the original image. For that, from the same Img2Img tab, select the inpaint option and place your reference painting there.
Then, you simply paint the area you want to edit (for example, your character's hair) and add the prompt you want to create (for example, straight long blonde hair), and you're done!
We recommend generating several batches of images so you can choose the one you like best and modify your prompt. However, in the end, it's always good to have a tool like Photoshop on hand to get perfect results if you're very meticulous.
Top 5 Extensions to Enhance Stable Diffusion's Capabilities
Now that you're familiar with Stable Diffusion, you might be eager to push your creativity further. Maybe you want to fix a specific hand position, force the model to generate a five-finger hand, specify a certain type of dress, enhance details, use a particular face, or transform your small image into a massive 8K file with minimum detail loss.
Extensions can help you achieve these goals. While there are numerous options available, we've highlighted five must-have extensions:
LoRAs: Because the Devil is in the Details
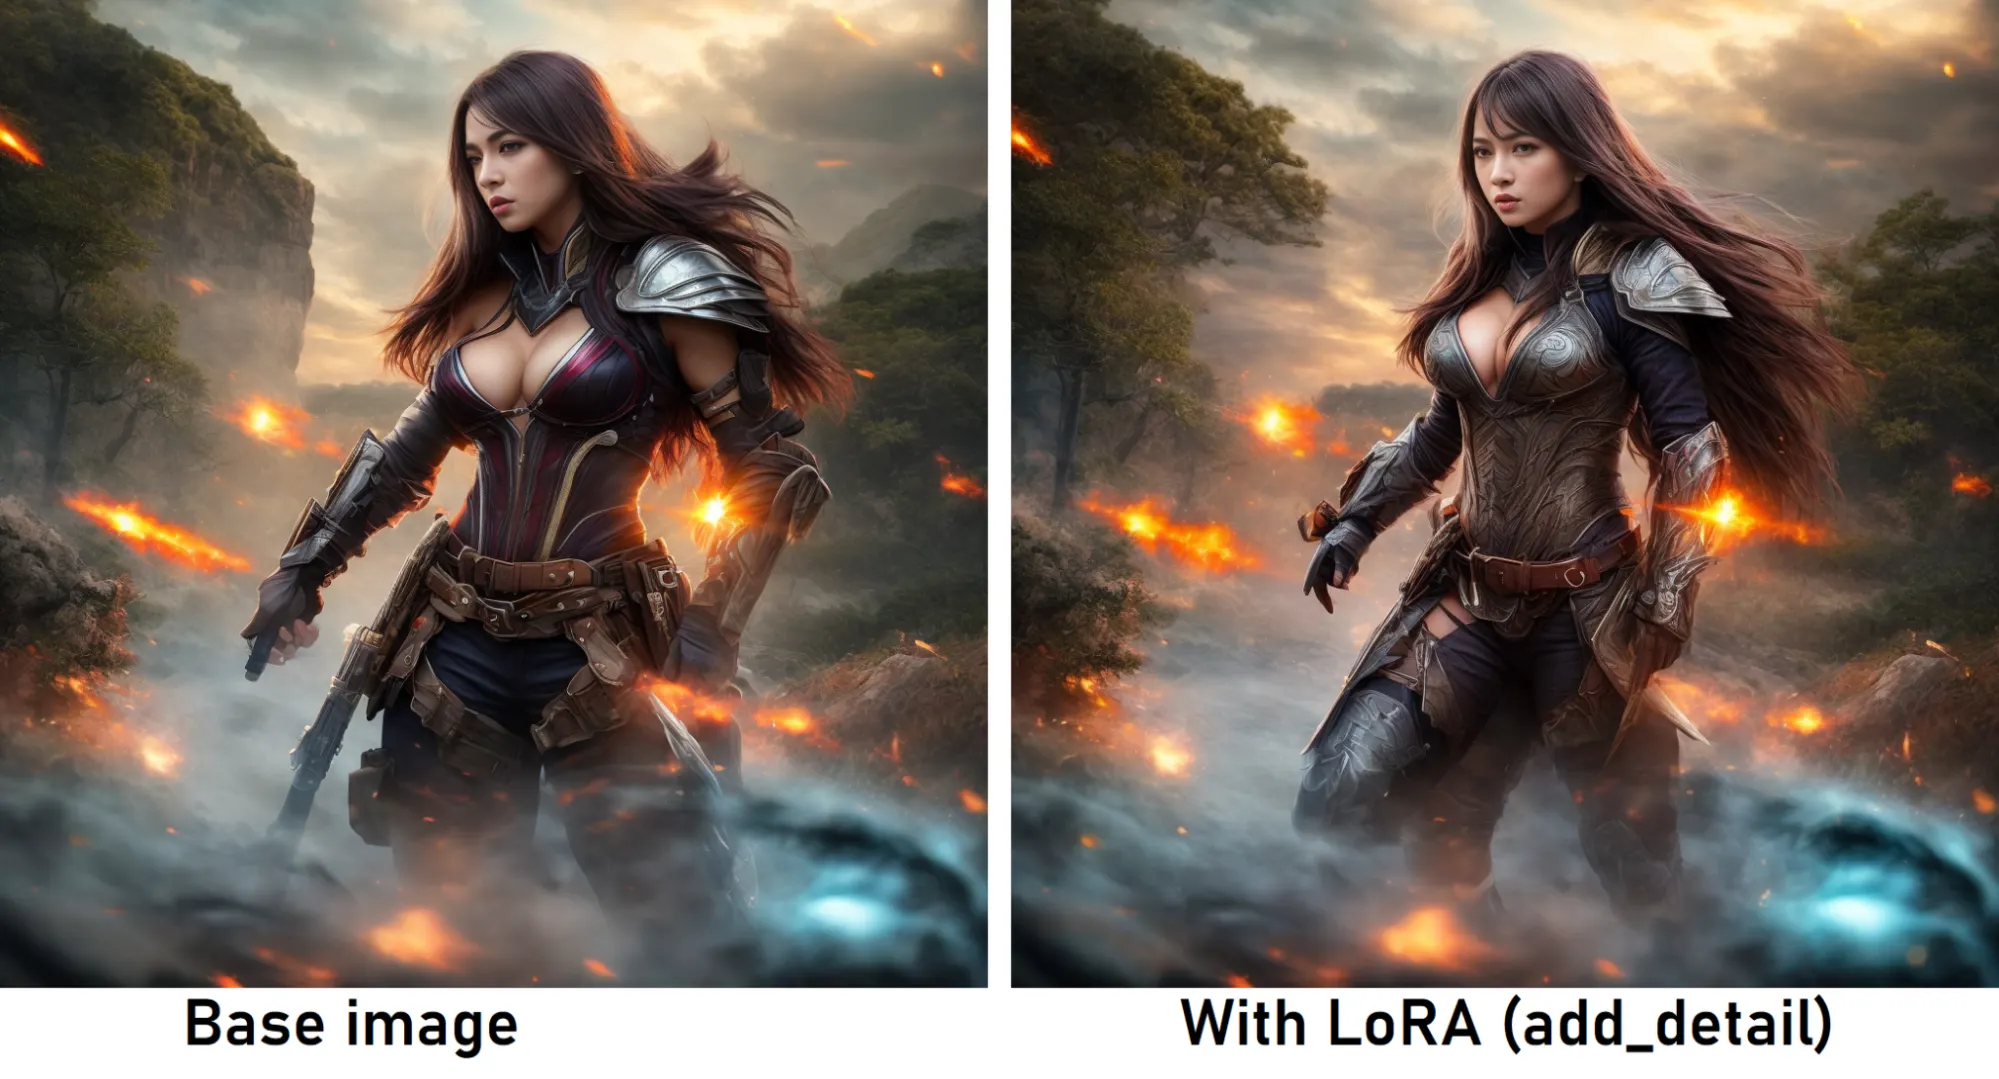
LoRAs are files designed to enhance the specificity of your model without downloading an entirely new model. This allows you to refine details, employ a certain face, dress, or style.
To install a LoRA, follow these steps:
- Click on the Extensions tab and select “Install from URL.”
- Enter the URL: https://github.com/kohya-ss/sd-webui-additional-networks.git in the box and click on Install.
- Once completed, click on “Installed” and then “Apply and restart UI.”
Installing a LoRA follows the same steps as installing a model. On Civitai, set the filter to “LoRA” and place the file into the LoRA folder using this route: \stable-diffusion-webui\models\Lora
Remember, some LoRAs require a specific keyword in your prompt to activate, so make sure to read their description before use.
To use a LoRA, navigate to the text2img tab, click on the icon resembling a small painting (Show/hide extra networks), and the LoRAs will appear beneath your prompt.
ControlNet: Unleashing the Power of Visual Magic
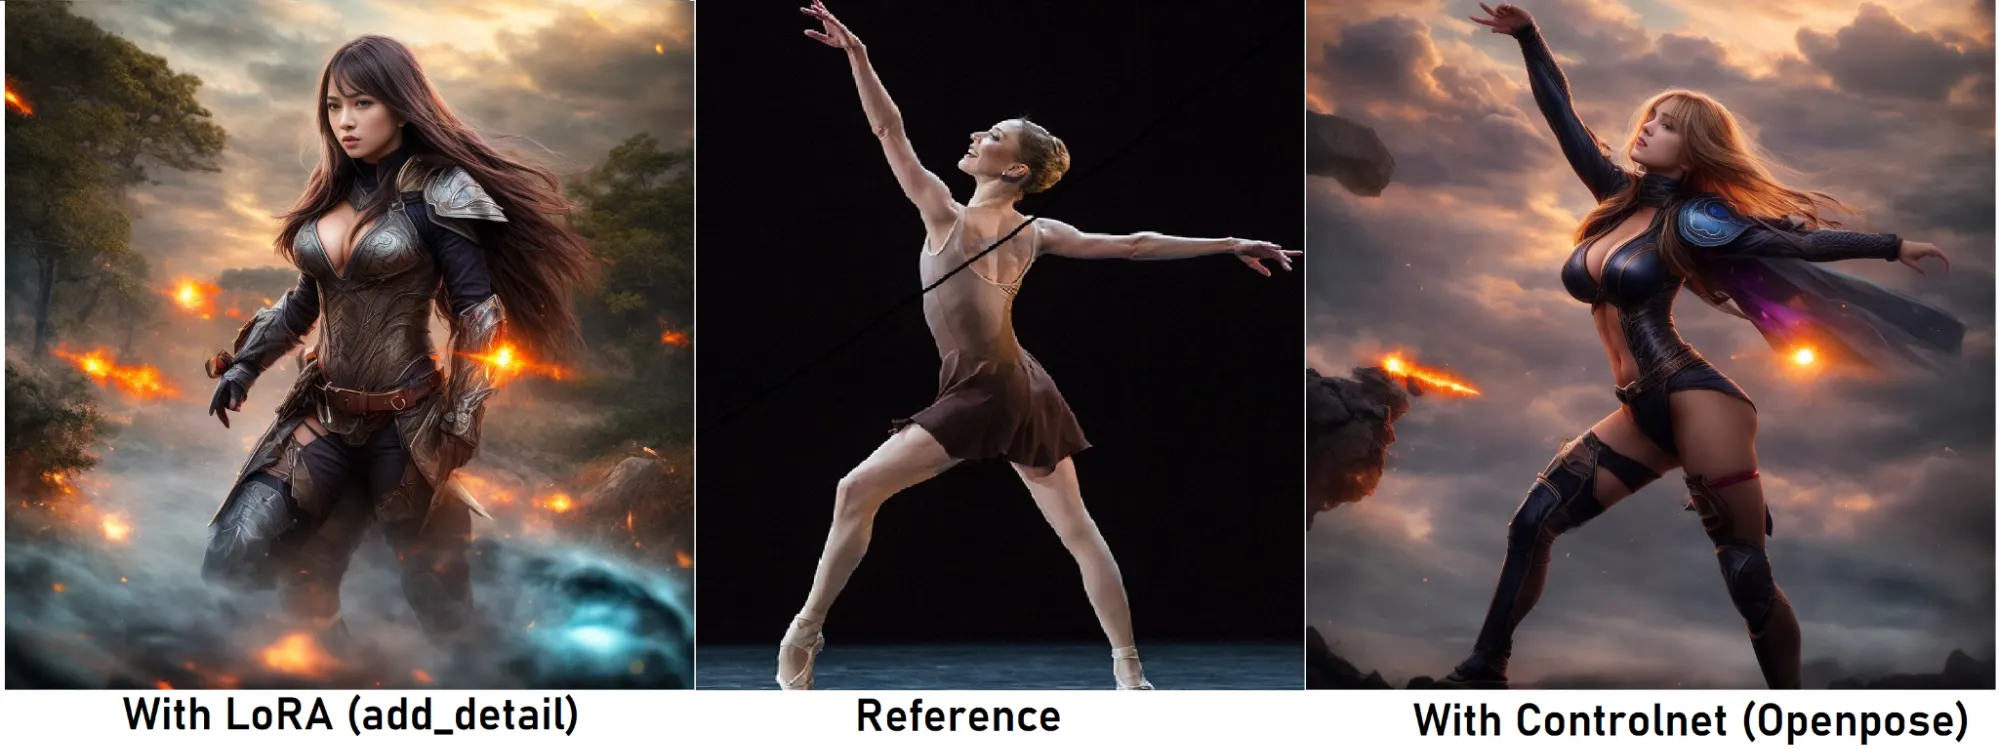
If you're undecided about Stable Diffusion's capabilities, let the ControlNet extension be the definitive answer. Boasting immense versatility and power, ControlNet enables you to extract compositions from reference images, proving itself as a game-changer in image generation.
ControlNet is truly a jack-of-all-trades. Whether you need to replicate a pose, emulate a color scheme, redesign your living space, craft five-finger hands, perform virtually limitless upscaling without overtaxing your GPU, or morph simple doodles into awe-inspiring 3D renders or photorealistic visuals, ControlNet paves the way.
Installing ControlNet involves these simple steps:
- Visit the extension page and select the 'Install from URL' tab.
- Paste the following URL into the 'URL for extension’s repository' field: https://github.com/Mikubill/sd-webui-controlnet
- Click 'Install'.
- Close your Stable Diffusion interface.
To enable ControlNet, you'll need to download models from this repository: https://huggingface.co/lllyasviel/ControlNet-v1-1/tree/main
Then, copy all the downloaded files into this folder: stable-diffusion-webui\extensions\sd-webui-controlnet\models
Upon restarting Stable Diffusion, you'll notice a new 'ControlNet' section in the text2img tab.
Two primary options are presented to you: a box to drag/drop your reference image, control type selection, and the preprocessor.
- The 'Reference image box' is where you upload the image you wish to reference for pose, face, color composition, structure, etc.
- The 'Control Type Selection' is where the ControlNet wizardry occurs. This feature allows you to determine what you want to copy or control.
You have other more advanced options that let you finetune results: Preprocessors (technique used to activate the controlnet), Weights (how important is your reference) and start/end points (When will the controlnet begin/end its influence)
Here's a quick overview of what each control type accomplishes:
- OpenPose: Pinpoints body's key parts and replicates a pose. You can select a pose for the entire body, face, or hands using the preprocessor.
- Canny: Converts your reference image into a black-and-white scribble with fine lines. This allows your creations to follow these lines as edges, resulting in an accurate resemblance to your reference.
- Depth: Generates a 'depth map' to create a 3D impression of the image, distinguishing near and far objects—ideal for mimicking 3D cinematic shots and scenes.
- Normal: A normal map infers the orientation of a surface—excellent for texturing objects like armors, fabrics, and exterior structures.
- MLSD: Recognizes straight lines, making it ideal for reproducing architectural designs.
- Lineart: Transforms an image into a drawing—useful for 2D visuals like anime and cartoons.
- Softedge: Similar to a Canny model but with softer edges, offering more freedom to the model and slightly less precision.
- Scribble: Converts an image into a scribble, yielding more generalized results than the Canny model. Also, you can create a scribble on paint, and use it as reference with no preprocessor to turn your images into realistic creations.
- Segmentation: Creates a color map of your image, inferring the objects within it. Every color represents a specific kind of object. You can use it to redecorate you image, or reimagine a scene with the same concept (for example turn a photo from the 1800’s into a photorealistic depiction of the same scenery on a cyberpunk alternate reality or just redecorate your room with a different bed, walls of a different color, etc)
- Tile: Adds details to the picture and facilitates upscaling without overburdening your GPU.
- Inpaint: Modifies the image or expands its details. Now, Thanks to the recent update and the "inpaint only + llama" model you can outpaint images with extreme attention to detail
- Shuffle: Reproduces the color structure of a reference image.
- Reference: Generates images similar to your reference in style, composition, and occasionally faces.
- T2IA: Lets you control the color and artistic composition of your image.
Mastering these options may take time, but the flexibility and customization they offer are worth the effort. Check out various tutorials and instructional videos online to get the most out of ControlNet.
Roop: Deepfakes at Your Fingertips
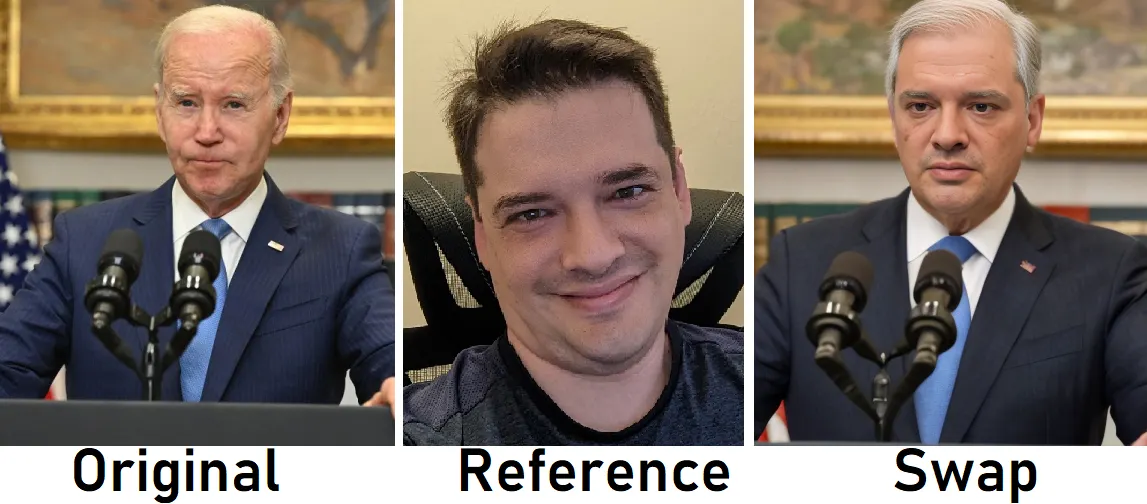
Roop provides a hassle-free method to generate realistic deepfakes. Instead of working with complex models or LoRAs, Roop handles the heavy lifting, enabling you to create high-quality deepfakes with a few simple clicks.
To download and activate, follow the instructions available on the official Roop Github repo
To use it, create a prompt, navigate to the Roop menu, upload a reference face, enable it, and generate your image. For the best results, use a high-res frontal shot of the face you wish to replicate. Remember, different images of the same person can yield varying results—some more lifelike than others.
Photopea: The Power of Photoshop Within Stable Diffusion
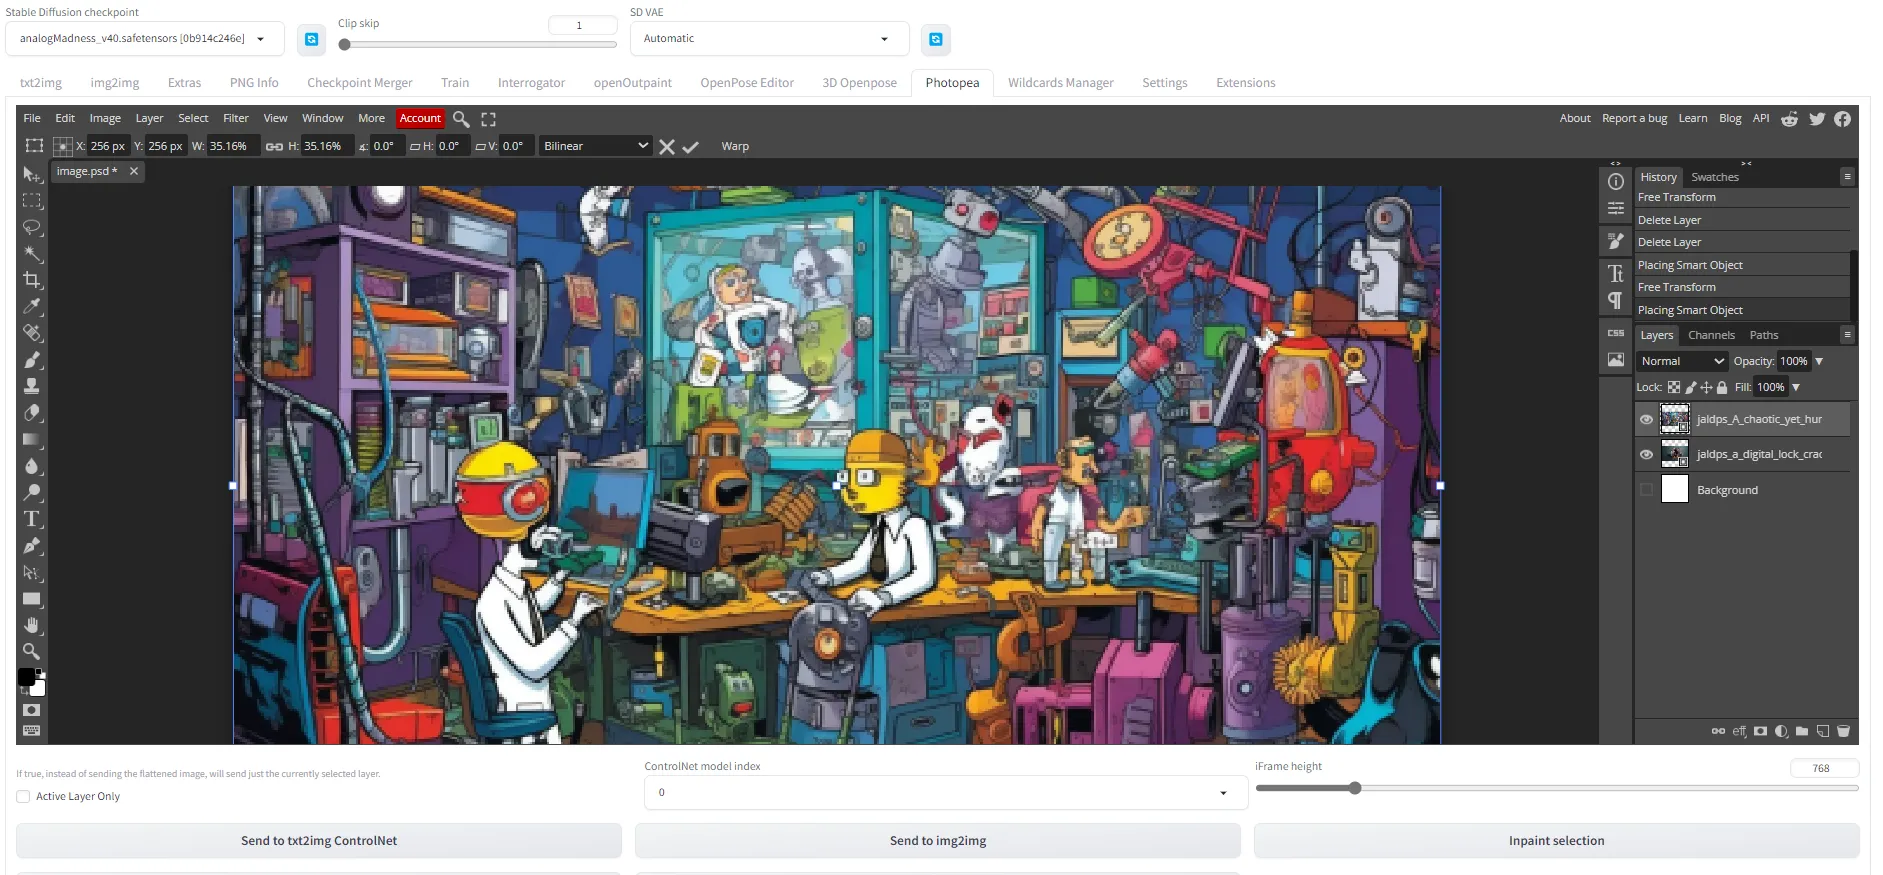
Sometimes, manual adjustments are needed to achieve the perfect result—that's where Photopea comes in. This extension brings Photoshop-like functionalities directly into the Stable Diffusion interface, allowing you to fine-tune your generated images without switching platforms.
You can install Photopea from this repository: https://github.com/yankooliveira/sd-webui-photopea-embed
CLIP Interrogator: Creating Prompts from Any Image
This is a great tool if you don’t know where to start with prompts. Take an image, past it into the box, run the interrogator and it will tell you what words can be associated with the image you provided.
The CLIP Interrogator is a handy tool for deriving keywords from a specific image. By combining OpenAI's CLIP and Salesforce's BLIP, this extension generates text prompts that match a given reference image.
You can install it from this repository: https://github.com/pharmapsychotic/clip-interrogator-ext.git
Conclusion
With Stable Diffusion, you become the maestro of your visual orchestra. Be it a "hyperrealistic portrait of Emma Watson as a sorceress" or an "intricate digital painting of a pirate in a fantasy setting," the only limit is your imagination.
Now, armed with your newfound knowledge, go forth and paint your dreams into reality, one text prompt at a time.